LaTeX, ( Lay-Tech) is a document preparation system for high-quality typesetting. This allows the users to invest their concentration, energy, and time into the content of the document without worrying about its appearance. Typesetting complex mathematical equations and the handling & generation of large bibliography become effortless with this tool in the bag.
It is a free software under LaTeX Project Public License (LPPL) with CTAN being the primary distribution source of LaTeX, from where it can be downloaded. However, for the functioning of LaTeX, you need to set up a TeX system first in your PC which you can get from CTAN.
For ease, You may install TeX distribution which includes a version of LaTeX itself, thereby making things easier to you. Here we present how to get along with TeX distributions for an easy installation.

Step 1: Get a TeX Distribution
First of all, you need to set up a collection of software on your computer. MikTeX is the most popular choice for window users. However, it may not be available for all window systems, so it is essential to give a prior look at the pre-requisites. ProTexT is very easy to install alternative of MikTeX for beginners with window operating systems. TeX Live is the popular choice for Unix type systems and MacTeX is popular for use in Macintosh.
Step 2: Get a good Editor
A good editor is all you need to fasten and simplify your work. For example, WinEdt is a powerful and versatile all-purpose editor for windows with superb features for the creation and compilation of LaTeX documents. It has been specifically designed and configured to integrate with a TeX system. WinEdt 10.3 is the latest official version of this program with a powerful Uniscribe library.
Many editors are available for Linux systems such as Lyx, TeXmaker, TeXstudio, Gummi, TeXpen, OverLeaf, Authorea, Pepeeria, and Kile. However, Kile is the best choice for Linux systems owing to its marvelous features. On the other hand, Vim-Latex is the best LaTeX editor for Mac with other options being Archimedes, Emacs, Lyx, etc. With Tex distribution and editor installed in your system, you are all set to get started with writing.
Step 3: Setting the Preamble
The preamble is the first section of latex document. In this, firstly appears the type of document, required packages, and then other formatting details for the document. All LaTeX commands begin with a backslash (\) in lowercase letters only.
Document class
The first line of the preamble is
documentclass [Option1, Option2, Option3,....]{class}
The class specifies the type of document you are going to prepare. There are various standard formats of documents available such as an article for articles in scientific journals, reports, books, beamer for presentations, slides, letters, proc for proceedings, etc. Many academic and scientific publishers provide their own special class files for articles and books for example IEEEtran for articles with IEEE transaction format. Document class options help the user specify font size, paper size format, layout, and various other options for the formatting of output.
| Font size | 10pt (default), 11pt, 12pt |
| Paper size and format | a4paper (default), letterpaper, a5paper, b5paper, executivepaper, legalpaper |
| Column | onecolumn (default), twocolumn |
| Formula specific options | fleqn (for the left alignment of formulas instead of centring), leqno ( To place the numbering of formulas on LHS of formula instead of RHS) |
| Landscape print mode | Landscape |
| Single or Double sided Documents | twoside, oneside |
| Chapter opening page | openright (chapter starts on right pages only, default for book), openany (default for report, not available in articles) |
| Vertical Alignment | flushbottom (all page with same text height and add extra vertical spaces in text when necessary), ruggedbottom (all pages with same text height but no vertical spaces added) |
Load Packages
After the document class, the next step is to load the packages to include graphics, color texts, source codes from files into your document. TeX distribution comes with a large number of pre-installed packages. So the command for including the packages is
usepackage[options]{package}
where package is the name of the package and options is a list of keywords triggering a special feature in that packages. Any number of packages can be used in a LaTeX document.
| Package | Purpose |
| amsmath | allows the use of most of the mathematical features in AMS-TEX |
| amssymb | allows the use of mathematical symbols developed by American Mathematical Society (AMS) |
| amsthm | allows the use of mathematical therorems developed by American Mathematical Society (AMS) |
| babel | facilitates the use of several languages |
| graphicx | allow the use of imported graphics |
| color | allow the use of colors |
| xypic | allow to draw tricky diagrams with arrows and lines |
For example: usepackage[dutch]{color}
If use a package that is pre-installed, you can download and install the package. Click here to know the complete procedure.
Step 4: Adding the Document Environment
After the declaration of document class and packages, the body of the text is enclosed between two commands which denote the beginning and end of the actual document.
begin{document}
body text
end{document}
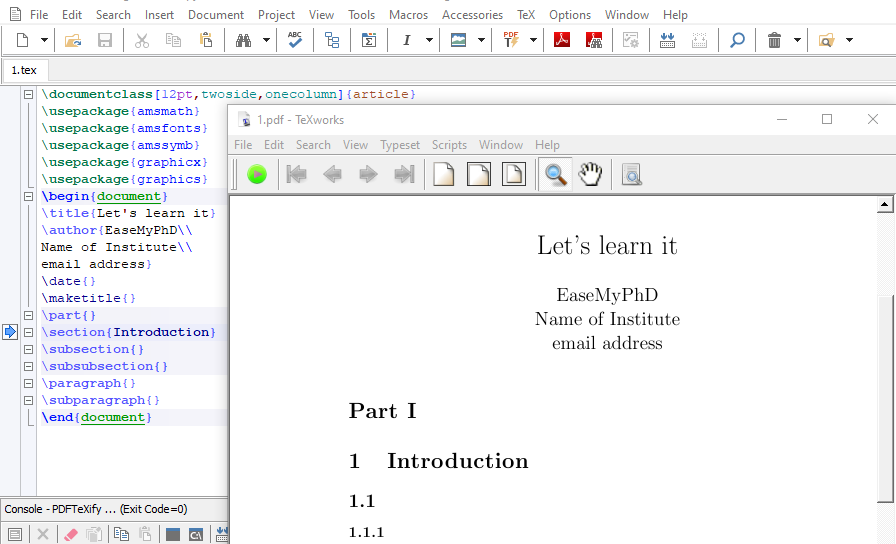
First line in the Document Environment states the title of the document which is enclosed in parentheses in the following command , followed by name of the author and date. Title, author and date are all examples of the metainformation which must always be terminated with maketitle command.
begin{document}
title{Title of the document}
author{Name of the author\
Institute\
Email address\
}
date{Today}
maketitle{}
end{document}
A double backslash (\\) is used for forced line termination. After the make title command, an abstract environment is used, in which abstract or summary is typed. In the body of the LaTeX document, seven-level of sectioning is provided to structure the document. The title of each division is enclosed in the braces given ahead of each command.
begin{document}
title{Title of the document}
author{Name of the author\
Institute\
Email address\
}
date{Today}
maketitle{}
begin{abstract}
end{abstract}
part{}
chapter{}
section{}
subsection{}
subsubsection{}
paragraph{}
subparagraph{}
end{document}
Compilation
After this compile command is used to compile the document. This option is available in the menu bar of the editor, which prompts the output in a pdf file format. After successful compilation, 6 additional files are created along with TeX file in the folder containing the TeX file. These 7 files are as follows:
- Performance monitor file
- SYNCTEX file
- Text document
- Adobe
- TeX document
- AUX file
- BBL file
copyright@EasMyPhD 2020
No Responses