Chapter 1: Introduction to LaTeX
1.1 What is LaTeX?
LaTeX is a high-quality typesetting system used for creating scientific and technical documents. Unlike word processors like Microsoft Word, LaTeX allows for greater control over document structure, formatting, and layout. This makes it an ideal choice for writing academic theses, research papers, and dissertations.
LaTeX (pronounced Lay-tech or Lah-tech) is a powerful document preparation system widely used in academia, especially for writing scientific papers, theses, and technical documents. Unlike standard word processors, LaTeX separates the content of a document from its formatting. This allows users to focus on writing without worrying too much about the visual design.
LaTeX is based on TeX, a typesetting system developed by Donald Knuth in the late 1970s. It is particularly well-suited for producing documents that include:
- Complex mathematical equations
- References and citations
- Large sections of structured text such as chapters, sections, and subsections
- High-quality figures and tables
While LaTeX does have a steeper learning curve compared to traditional word processors like Microsoft Word, it provides unparalleled control over formatting, which is why it remains popular in research fields like physics, mathematics, computer science, engineering, and linguistics.
1.2 Why Use LaTeX for Thesis Writing?
LaTeX provides several benefits for writing a thesis:
- Consistency in Formatting: LaTeX automatically handles most aspects of document formatting, ensuring consistency throughout your document. This is particularly helpful when writing a long and complex document like a thesis.
- Automated Table of Contents and Lists: LaTeX will automatically generate and update your table of contents, list of figures, and list of tables as you add sections, figures, and tables.
- Precise Control of Layout: You have full control over page layout, margins, fonts, and spacing. If your university has specific formatting guidelines, LaTeX allows you to easily comply with them.
- Seamless Citations and References: With the help of BibTeX (or BibLaTeX), LaTeX manages all your citations, bibliographies, and references with ease, ensuring that they are correctly formatted.
- Excellent Mathematical Typesetting: If your thesis involves complex equations or mathematics, LaTeX is unmatched in its ability to produce professional-looking mathematical content.
- Scalability: LaTeX is designed for large documents, allowing you to organize your thesis into multiple files and compile them into a single, coherent document. This is much easier to manage than dealing with a single large word processor file.
1.3 Challenges of LaTeX
- Learning Curve: LaTeX’s syntax can be overwhelming for beginners, especially if you are accustomed to WYSIWYG (What You See Is What You Get) editors.
- Customization: While LaTeX offers extensive customization, it can take time to learn how to tweak and fine-tune your document’s appearance.
However, the time invested in learning LaTeX is well worth it, as it simplifies the task of formatting and ensures a polished, professional document.
1.4 How LaTeX Works
LaTeX documents are written in plain text files with the extension .tex. Instead of directly formatting the text as you write (like in a word processor), you use a set of commands and tags to define how the document should be formatted. For example, to create a section heading, you write:
\section{Introduction}
When you compile the .tex file, LaTeX processes the commands and generates a beautifully formatted document (usually in PDF format).
1.4.1 The LaTeX Workflow:
- Write the content of your document in a
.texfile using LaTeX commands. - Compile the
.texfile using a LaTeX engine (like pdflatex) to generate a PDF or other desired output format. - View and edit the generated PDF and go back to your
.texfile to make necessary adjustments.
1.5 The Structure of a Basic LaTeX Document
A LaTeX document consists of two main parts:
- The Preamble: This is where you define the overall document structure, including settings for margins, fonts, and other global parameters. It’s also where you load any additional LaTeX packages.
- The Document Body: This contains the actual content of your thesis, including chapters, sections, figures, tables, and equations.
Here’s an example of a simple LaTeX document:
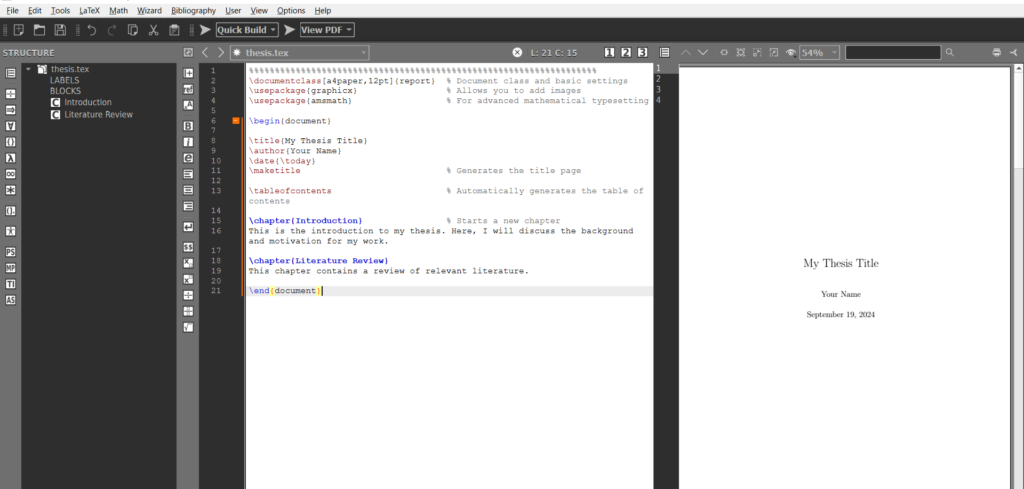
\documentclass[a4paper,12pt]{report}  % Document class and basic settings
\usepackage{graphicx}                 % Allows you to add images
\usepackage{amsmath}                  % For advanced mathematical typesetting

\begin{document}

\title{My Thesis Title}
\author{Your Name}
\date{\today}
\maketitle                            % Generates the title page

\tableofcontents                      % Automatically generates the table of contents

\chapter{Introduction}                % Starts a new chapter
This is the introduction to my thesis. Here, I will discuss the background and motivation for my work.

\chapter{Literature Review}
This chapter contains a review of relevant literature.

\end{document}
Explanation of the Key Commands:
\documentclass{}: Specifies the document class. In this case, we are using thereportclass, which is ideal for theses.\usepackage{}: Adds extra functionality to LaTeX (e.g.,graphicxfor images,amsmathfor advanced math typesetting).\begin{document}: Signals the start of the document body.\title,\author, and\date: Define the title page content.\maketitle: Generates the title page.\tableofcontents: Creates the table of contents based on the chapters and sections in the document.\chapter{}: Defines a new chapter.\end{document}: Signals the end of the document.
When you compile this .tex file, LaTeX will automatically generate a well-formatted PDF containing a title page, table of contents, and the first two chapters.
1.6 How LaTeX Handles Formatting
One of LaTeX’s greatest strengths is its ability to automatically handle formatting, so you don’t need to worry about adjusting font sizes, margins, or spacing manually. For example:
- Headings: LaTeX will automatically number chapters, sections, and subsections.
- Equations: Mathematical equations are formatted professionally, and LaTeX ensures that they are properly aligned.
- Tables and Figures: LaTeX makes it easy to position figures and tables, and automatically adjusts their layout to avoid overlapping with text.
With LaTeX, formatting is not a manual task. Instead, you define the overall structure and let LaTeX handle the rest.
1.7 Common Uses of LaTeX in Thesis Writing
- Mathematical and Scientific Writing: LaTeX is widely used in academic fields that require precise typesetting of complex mathematical equations.
- Long Documents: LaTeX excels at handling large, multi-chapter documents like theses and dissertations.
- Figures and Tables: LaTeX provides advanced capabilities for inserting and managing figures and tables, including the ability to generate lists of figures and tables.
- Bibliographies and Citations: LaTeX integrates well with bibliography management tools like BibTeX, making it easy to manage large numbers of references and citations.
1.8 Getting Started with LaTeX
Before you start writing your thesis in LaTeX, you need to install a LaTeX distribution and a text editor. The most commonly used LaTeX distributions are TeX Live and MiKTeX, while popular LaTeX editors include TeXworks, Texmaker, and Overleaf (a cloud-based LaTeX editor).
Once your LaTeX environment is set up, you can start writing your thesis by creating a .tex file and compiling it to produce a PDF.
Chapter 2: Setting Up Your LaTeX Environment
2.1 Downloading and Installing LaTeX
Before you can start writing your thesis in LaTeX, the first step is to set up your LaTeX environment. This involves installing a LaTeX distribution and a text editor where you will write your code.
2.1.1 Choosing a LaTeX Distribution
A LaTeX distribution is a bundle of programs and files that are needed to compile LaTeX documents into readable formats like PDF. The most commonly used distributions are:
- TeX Live (Recommended for all platforms: Windows, macOS, and Linux)
- MiKTeX (Primarily for Windows and macOS users)
2.1.2 TeX Live
TeX Live is a comprehensive distribution that works across platforms and is highly recommended for its stability and features. It includes all the tools you need to compile LaTeX documents into different formats, including PDF. You can download TeX Live from its official website:
- For Windows: TeX Live for Windows
- For macOS: TeX Live for macOS
- For Linux: You can install TeX Live via your package manager (
sudo apt-get install texlive-fullfor Ubuntu).
2.1.2 MiKTeX
MiKTeX is another popular LaTeX distribution that is user-friendly and frequently updated. It allows you to install additional packages on-the-fly, making it convenient for users who might need various LaTeX features later. You can download MiKTeX from its official website:
- MiKTeX for Windows/macOS: MiKTeX Download
Once downloaded, follow the installation prompts to install either distribution. After installation, your system will be ready to compile LaTeX documents.
2.2 Setting Up an Integrated Development Environment (IDE)
While you can technically write LaTeX code in any plain text editor (like Notepad or TextEdit), using an Integrated Development Environment (IDE) specifically designed for LaTeX will make your workflow smoother and more efficient. IDEs often include features like syntax highlighting, error checking, and one-click compilation to generate your PDF document.
2.2.1 Popular LaTeX Editors
Here are some of the most widely used LaTeX editors:
Overleaf (Online Cloud-Based Editor)
- Overleaf is a popular cloud-based LaTeX editor that allows you to write and compile LaTeX documents entirely online. It is ideal for collaborative projects, as multiple users can edit the same document in real-time.
- Pros: No installation needed, easy collaboration, automatic saving, large community.
- Cons: Requires internet connection.
Website: Overleaf
TeXworks (Offline Editor)
- TeXworks is a simple, easy-to-use LaTeX editor that comes bundled with most LaTeX distributions, including TeX Live and MiKTeX.
- Pros: Lightweight, straightforward interface, good for beginners.
- Cons: Limited advanced features compared to other editors.
Website: TeXworks
Texmaker
- Texmaker is a cross-platform LaTeX editor with a wide range of features, including PDF viewing, spell-checking, and code folding. It offers an integrated LaTeX development environment.
- Pros: Feature-rich, built-in PDF viewer, cross-platform (Windows, macOS, Linux).
- Cons: Slightly more complex for beginners.
Website: Texmaker
Visual Studio Code (VSCode) with LaTeX Workshop Extension
- VSCode is a highly customizable code editor, and with the LaTeX Workshop extension, it becomes a powerful LaTeX IDE.
- Pros: Great for users familiar with code editors, highly customizable, built-in terminal.
- Cons: Slightly steeper learning curve for beginners.
Website: Visual Studio Code
2.3 Writing Your First LaTeX Document
Now that your LaTeX environment is set up, let’s dive into writing your first LaTeX document. The basic structure of any LaTeX document consists of a preamble and a body.
2.3.1 Basic Structure of a LaTeX Document
- Preamble: This section defines the overall structure and style of the document. It is where you specify the document class, load necessary packages, and define global formatting options.
- Document Body: This is where the actual content (such as chapters, sections, text, and images) is written.
Here is a step-by-step guide to creating a simple LaTeX document:
- Open your LaTeX editor (Overleaf, TeXworks, or another).
- Create a new file and save it as
thesis.tex. - Write the following basic LaTeX code:
\documentclass[a4paper,12pt]{report}  % Document class and font size

\usepackage{graphicx}                 % Package to handle images
\usepackage{amsmath}                  % Package for advanced mathematical typesetting

\begin{document}

\title{My First Thesis Chapter}       % Title of the document
\author{Your Name}                    % Author name
\date{\today}                         % Date of compilation
\maketitle                            % Generate the title page

\tableofcontents                      % Automatically generate the table of contents

\chapter{Introduction}                % Start of a new chapter
Welcome to LaTeX! This is the first chapter of my thesis. In this chapter, I will introduce the topic of my research and provide the necessary background.

\section{Background}                  % Start of a section within the chapter
Here is where the background of the research goes. This section explains the motivation behind the thesis.

\subsection{Subsection Example}        % Example of a subsection
This subsection dives deeper into the details of the background.

\chapter{Literature Review}            % Start of the second chapter
In this chapter, I will discuss the literature related to my research.

\end{document}                         % End of the document
Explanation of the Key Commands:
\documentclass[a4paper,12pt]{report}: Defines the document class as a report with A4-sized paper and a font size of 12pt. Thereportclass is suitable for writing a thesis.\usepackage{graphicx}: Imports thegraphicxpackage, which allows you to add images to your document.\usepackage{amsmath}: Imports theamsmathpackage, enabling advanced mathematical typesetting.\maketitle: Generates the title page using the information provided by\title{},\author{}, and\date{}.\tableofcontents: Automatically generates a table of contents based on the chapters, sections, and subsections in your document.\chapter{}: Creates a new chapter.\section{}: Creates a new section within a chapter.\subsection{}: Creates a subsection within a section.\end{document}: Marks the end of the LaTeX document.
2.3.2 Compiling the LaTeX Document
After writing your LaTeX code, the next step is to compile it and generate a PDF. The compilation process converts your .tex file into a PDF format that you can view and share.
To compile the document:
- In Overleaf, simply click the “Recompile” button, and the PDF will automatically be generated and displayed on the right.
- In TeXworks or Texmaker, you can click the green “Play” or “Compile” button to generate the PDF.
- In VSCode with the LaTeX Workshop extension, use the command
Ctrl + Alt + Bto compile the document.
Once compiled, you will have a neatly formatted PDF containing a title page, table of contents, and the first two chapters of your thesis.
2.4 Packages in LaTeX
LaTeX is highly modular, and you can add extra functionality to your documents by using packages. Packages are like plugins that extend the core functionality of LaTeX, allowing you to customize your document to meet specific needs.
2.4.1 Commonly Used LaTeX Packages
Here are some of the most useful LaTeX packages for writing a thesis:
- graphicx: Allows you to include images in your document.
- amsmath: Enhances LaTeX’s mathematical capabilities, adding support for more complex equations.
- geometry: Lets you customize page layout, margins, and paper size.
- setspace: Enables you to control line spacing (e.g., single, one-and-a-half, or double spacing).
- hyperref: Adds clickable links to your table of contents, references, and URLs.
To include a package in your LaTeX document, simply add the \usepackage{} command in the preamble:
\usepackage{graphicx}   % For including images
\usepackage{setspace}   % For controlling line spacing
2.5 Testing the Setup
Now that you’ve written and compiled your first LaTeX document, it’s time to test your setup by experimenting with different LaTeX commands and packages. Try adding new chapters, sections, and even images or equations to see how LaTeX handles them.
For example, add an image to your document using the graphicx package:
\begin{figure}[h]
    \centering
    \includegraphics[width=0.5\textwidth]{example-image} % Replace 'example-image' with your image file name
    \caption{This is an example image.}
    \label{fig:example}
\end{figure}
You can also explore formatting text, adding lists, or experimenting with mathematical equations using amsmath.
Chapter 3: Document Structure and Formatting in LaTeX
3.1 Understanding Document Classes
In LaTeX, the overall structure and formatting of your document are controlled by the document class. A document class determines how different elements—like sections, figures, tables, and references—are formatted.
When writing a thesis, you will typically use the report or book class. The choice of document class affects the layout and style of your document.
3.1.1 Common Document Classes
- article: Used for shorter documents like essays, reports, or journal articles.
- Pros: Simple and easy to work with.
- Cons: Not designed for long documents with chapters.
\documentclass{article} - report: Ideal for longer documents like theses and technical reports, which often contain chapters.
- Pros: Allows chapters and structured content.
- Cons: Less sophisticated than the
bookclass for very large documents.
\documentclass{report} - book: Similar to the
reportclass but better suited for very long documents, especially if your thesis contains multiple parts.- Pros: Comprehensive support for different sections, parts, and chapters.
- Cons: Slightly more complex than the
reportclass.
\documentclass{book} - thesis (Custom Classes): Some institutions provide their own LaTeX class, typically named
thesis.cls, that formats your document according to specific university requirements. Always check if your institution has such a class file.
3.2 Structuring a Thesis Document
A well-organized thesis document typically consists of various chapters, sections, subsections, and appendices. LaTeX makes it easy to structure your document hierarchically.
3.2.1 Chapters, Sections, and Subsections
A thesis often contains multiple chapters, each divided into sections and subsections. Here’s how you can define chapters, sections, and subsections in LaTeX:
\chapter{Introduction}     % Creates a new chapter
\section{Background}       % Creates a section within a chapter
\subsection{Motivation}    % Creates a subsection
\subsubsection{Details}    % Further subdivision into subsubsections
Hierarchy Overview:
- \chapter{}: Top-level division (used in
reportandbookclasses). - \section{}: Major section of a chapter.
- \subsection{}: Subdivision of a section.
- \subsubsection{}: Subdivision of a subsection.
You can also add paragraphs or subparagraphs for finer divisions if necessary:
\paragraph{First paragraph}
\subparagraph{Sub-paragraph under paragraph}
3.3 Formatting Your Thesis
LaTeX provides powerful commands to control the formatting of text, paragraphs, lists, and other elements in your thesis. This ensures that your document not only follows academic standards but also remains aesthetically appealing.
3.3.1 Fonts and Font Sizes
You can easily change the font size of specific sections or the entire document. LaTeX supports various font sizes, ranging from tiny (\tiny) to very large (\Huge).
To change the font size of the entire document, modify the \documentclass options:
\documentclass[12pt]{report} % Changes font size to 12pt for the whole document
To change the font size of specific text, you can use:
{\small This text is smaller than the default font size.}
{\large This text is larger than the default font size.}
Other available font sizes include \tiny, \scriptsize, \footnotesize, \normalsize, \large, \Large, \LARGE, and \Huge.
3.3.2 Line Spacing
You may want to adjust the line spacing in your thesis for readability or to meet institutional requirements. The setspace package makes this easy:
\usepackage{setspace}
\doublespacing  % Sets the entire document to double spacing
You can also adjust spacing for specific parts of the document:
\begin{singlespace}
This text is in single spacing.
\end{singlespace}
3.4 Page Layout
LaTeX allows you to customize the layout of your pages, including margins, headers, footers, and page numbering. The geometry package is particularly useful for adjusting page margins.
3.4.1 Setting Margins
The geometry package allows you to control the margins of your document. Here’s an example of how to set 1-inch margins on all sides:
\usepackage[a4paper, margin=1in]{geometry}
You can also set different margins for different parts of the document:
\geometry{top=1in, bottom=1.5in, left=1.25in, right=1.25in}
3.4.2 Headers and Footers
The fancyhdr package enables you to customize headers and footers, including adding page numbers and section titles.
To use the package:
\usepackage{fancyhdr}
\pagestyle{fancy}

% Customize header and footer
\fancyhf{}  % Clear default header/footer
\fancyhead[L]{Chapter \thechapter}  % Left-aligned chapter title in header
\fancyfoot[C]{\thepage}  % Center-aligned page number in footer
With this code, each page will display the current chapter in the header and the page number in the footer.
3.5 Managing Long Documents
A thesis can become a lengthy and complex document, but LaTeX helps you manage large projects effectively by allowing you to break your document into smaller files.
3.5.1 Using \input{} and \include{}
When working on a large document like a thesis, it’s a good idea to split each chapter into separate .tex files and compile them into a single document.
Here’s how to do it:
- Create separate files for each chapter (e.g.,
chapter1.tex,chapter2.tex). - In your main file (e.g.,
thesis.tex), use the\input{}or\include{}commands to include these files:
\include{chapter1}
\include{chapter2}
The \include{} command is ideal for long documents because it skips the compilation of files you aren’t currently working on, speeding up the process. The \input{} command is more suited for shorter or simpler files.
3.5.2 Table of Contents
LaTeX automatically generates a table of contents based on the chapters, sections, and subsections in your document. Simply add the following command where you want the table of contents to appear:
\tableofcontents
Every time you compile the document, the table of contents will update automatically.
3.6 Including Figures and Tables
LaTeX makes it easy to include figures and tables in your thesis, with options for labeling and referencing them throughout the document.
3.6.1 Adding Figures
To include an image in your document, use the graphicx package and the \includegraphics{} command. Make sure the image file is in the same directory as your .tex file, or provide the full path to the image.
\usepackage{graphicx}

\begin{figure}[h]
    \centering
    \includegraphics[width=0.7\textwidth]{image.png}
    \caption{This is an example figure.}
    \label{fig:example}
\end{figure}
This will insert an image with a caption, and you can reference it later using the label:
latexCopy codeAs shown in Figure \ref{fig:example}, the data is conclusive.
3.6.2 Creating Tables
LaTeX allows you to create neat tables with the tabular environment:
\begin{table}[h]
    \centering
    \begin{tabular}{|c|c|c|}
        \hline
        Column 1 & Column 2 & Column 3 \\ \hline
        Data 1   & Data 2   & Data 3   \\ \hline
    \end{tabular}
    \caption{Example table.}
    \label{tab:example}
\end{table}
Like figures, tables can also be labeled and referenced later:
As shown in Table \ref{tab:example}, the data supports our hypothesis.
Chapter 4: Advanced Document Features in LaTeX
4.1 Creating Cross-References
One of the most powerful features of LaTeX is the ability to easily create cross-references for sections, figures, tables, equations, and other elements in your document. These references automatically update as you modify the document, ensuring accuracy.
4.1.1 Referencing Sections and Subsections
To reference a section or subsection, you first need to label it with the \label{} command. Then, you can refer to that section anywhere in the document using \ref{}.
\section{Introduction}
\label{sec:intro} % Label for the section

This is a reference to Section \ref{sec:intro}.
4.1.2 Referencing Figures and Tables
When you add figures or tables, it’s good practice to label them and reference them later in the text:
\begin{figure}[h]
    \centering
    \includegraphics[width=0.5\textwidth]{example-image.png}
    \caption{An example figure.}
    \label{fig:example}
\end{figure}

As shown in Figure \ref{fig:example}, the results are evident.
Similarly, for tables:
\begin{table}[h]
    \centering
    \begin{tabular}{|c|c|}
        \hline
        Column 1 & Column 2 \\ \hline
        Data 1   & Data 2   \\ \hline
    \end{tabular}
    \caption{An example table.}
    \label{tab:example}
\end{table}

Refer to Table \ref{tab:example} for data analysis.
4.1.3 Hyperlinks with hyperref
The hyperref package allows you to create clickable hyperlinks within your document. It’s especially useful when generating a PDF, as clicking the link will jump to the corresponding section, figure, or table.
To include it in your document:
\usepackage{hyperref}
Now, your references will automatically become clickable links in the PDF.
For external links:
\href{https://www.example.com}{Click here to visit the website.}
4.2 Citations and Bibliography
Citing references and creating a bibliography is a crucial part of any academic thesis. LaTeX offers a wide range of citation styles, allowing you to manage references using tools like BibTeX or biblatex.
4.2.1 Using BibTeX for Managing References
BibTeX is a tool that helps you manage and format your bibliography in LaTeX. You create a .bib file, which stores all your references, and then cite these references in your LaTeX document.
- Create a
.bibfile:
@article{Author2020,
  author    = {John Author and Jane Doe},
  title     = {Research Paper Title},
  journal   = {Journal Name},
  year      = {2020},
  volume    = {42},
  pages     = {1-10}
}
- Include the
.bibfile in your LaTeX document:
\bibliographystyle{plain}  % Style of the bibliography
\bibliography{references}  % Name of your .bib file (without the .bib extension)
- Cite the reference in your text:
According to \cite{Author2020}, the research shows...
After compiling the document, LaTeX will automatically generate a formatted bibliography.
4.2.2 Using biblatex
biblatex offers more flexibility and customization for your bibliography compared to BibTeX. You can use it as follows:
- Load the package:
\usepackage[backend=biber, style=apa]{biblatex}  % Example: APA citation style
\addbibresource{references.bib}                 % Add your .bib file
- Cite in your document:
\autocite{Author2020}
- Print the bibliography:
\printbibliography
4.3 Mathematical Equations and Symbols
LaTeX is widely recognized for its powerful handling of mathematical equations, symbols, and notations. This makes it the preferred tool for technical and scientific writing.
4.3.1 Inline Equations
For short equations that appear within the text, you can use inline math mode by enclosing the equation in dollar signs:
The famous equation $E = mc^2$ is central to physics.
4.3.2 Display Equations
For larger equations that need to be centered and stand on their own, you can use the equation environment:
\begin{equation}
    E = mc^2
    \label{eq:einstein}
\end{equation}

Equation \ref{eq:einstein} shows the relationship between energy and mass.
4.3.3 Mathematical Symbols
LaTeX supports an extensive set of symbols, including Greek letters and operators. Here are a few common ones:
- Greek Letters: $\alpha$, $\beta$, $\gamma$, $\delta$, $\lambda$
- Mathematical Operators: $\sum$, $\prod$, $\int$, $\frac{a}{b}$
- Set Symbols: $\in$, $\cup$, $\cap$, $\subset$
The amsmath package provides even more advanced features for handling equations:
\usepackage{amsmath}
4.4 Lists in LaTeX
Lists are an essential element in any document, helping to organize information into bullets or numbered points. LaTeX provides several list environments to meet different needs.
4.4.1 Itemized Lists
An itemized list creates a bulleted list:
\begin{itemize}
    \item First item
    \item Second item
    \item Third item
\end{itemize}
This will generate:
- First item
- Second item
- Third item
4.4.2 Enumerated Lists
An enumerated list creates a numbered list:
\begin{enumerate}
    \item First item
    \item Second item
    \item Third item
\end{enumerate}
This will generate:
- First item
- Second item
- Third item
4.4.3 Descriptive Lists
A descriptive list allows you to define both terms and their descriptions:
\begin{description}
    \item[Term 1] Description of term 1.
    \item[Term 2] Description of term 2.
\end{description}
4.5 Footnotes and Endnotes
Footnotes and endnotes are helpful for providing additional information without interrupting the flow of the main text.
4.5.1 Adding Footnotes
You can add footnotes anywhere in the document using the \footnote{} command:
This is a statement with a footnote.\footnote{This is the footnote text.}
4.5.2 Customizing Footnotes
If you want to change the numbering style of the footnotes, you can use:
\renewcommand{\thefootnote}{\roman{footnote}} % Roman numerals
4.6 Appendices
Appendices are used to include supplementary material that is important but not part of the main body of the text. LaTeX makes it easy to add appendices.
4.6.1 Creating Appendices
To create appendices in LaTeX, you simply use the \appendix command, which modifies the chapter and section numbering:
\appendix
\chapter{Appendix A: Additional Data}
This will create a new appendix section, and chapters within the appendix will be labeled alphabetically (e.g., Appendix A, Appendix B).
Chapter 5: Customizing Your LaTeX Thesis
5.1 Customizing the Title Page
The title page is one of the most important parts of your thesis, as it contains essential information like your name, the thesis title, and your institution. You can easily create a custom title page in LaTeX by using the title, author, and date commands, but many institutions have specific formatting requirements, so customization is often necessary.
5.1.1 Basic Title Page
A simple title page can be created using the \maketitle command. You define the title, author, and date at the beginning of your document:
latexCopy code\title{My Thesis Title}
\author{Author Name}
\date{September 2024}

\begin{document}
\maketitle
\end{document}
This will generate a basic title page with the title, author name, and date centered on the page.
5.1.2 Customizing the Title Page Layout
To fully customize the layout of the title page, you can bypass the \maketitle command and create the title page manually using various LaTeX commands for positioning, fonts, and spacing:
latexCopy code\begin{titlepage}
    \centering
    {\Huge \textbf{My Thesis Title}} \\[1.5cm]

    {\Large Author Name} \\[1cm]

    A thesis submitted in fulfillment of the requirements\\
    for the degree of Doctor of Philosophy\\
    at \textbf{Institution Name}\\[2cm]

    {\Large September 2024}
\end{titlepage}
In this example, the title is enlarged using \Huge and \textbf{} for bold text. You can adjust the vertical spacing with brackets like [1.5cm] or [1cm] to control the appearance.
5.1.3 Adding Logos or Images
If your institution requires a logo on the title page, you can use the graphicx package to insert an image:
latexCopy code\usepackage{graphicx}

\begin{titlepage}
    \centering
    \includegraphics[width=0.3\textwidth]{university-logo.png} \\[1cm]
    {\Huge \textbf{Thesis Title}} \\[1.5cm]
    {\Large Author Name} \\[1cm]
    {\Large September 2024}
\end{titlepage}
This inserts a logo above the thesis title and positions it using the \centering and \includegraphics[] commands. You can adjust the width of the image and the spacing around it.
5.2 Customizing Fonts and Styles
LaTeX offers a variety of font options to customize the appearance of your thesis. You can change the entire document’s font or customize specific sections to stand out.
5.2.1 Changing the Overall Font
By default, LaTeX uses the Computer Modern font, but you can switch to other popular fonts using the fontspec package (for XeLaTeX or LuaLaTeX) or packages like mathptmx for traditional LaTeX.
To change the font to Times New Roman (commonly used in theses), you can add:
latexCopy code\usepackage{mathptmx} % Sets font to Times New Roman
If you’re using XeLaTeX or LuaLaTeX, you can select any system font:
latexCopy code\usepackage{fontspec}
\setmainfont{Times New Roman}
This will change the main font of the entire document to Times New Roman.
5.2.2 Customizing Specific Text
You can also change the font or style of specific parts of your thesis. For instance, to make a particular section bold or italicized:
latexCopy code\textbf{This text is bold.}  % Bold text
\textit{This text is italicized.}  % Italicized text
\texttt{This text is in typewriter font.}  % Monospace (typewriter) font
5.2.3 Changing Font Sizes
If you want to customize the font size for specific parts of your thesis, LaTeX provides several options, ranging from \tiny to \Huge. You can use these to adjust the font size of headers, titles, or text:
latexCopy code{\small This text is smaller than usual.}

{\Huge This text is much larger than usual.}
5.3 Headers, Footers, and Page Numbers
Customizing the headers, footers, and page numbers is a common requirement for theses. LaTeX allows you to modify these elements using the fancyhdr package.
5.3.1 Using the fancyhdr Package
The fancyhdr package gives you full control over headers and footers, allowing you to insert text, section titles, and page numbers in various formats.
latexCopy code\usepackage{fancyhdr}
\pagestyle{fancy}

% Clear default settings
\fancyhf{}

% Left-aligned header with chapter title
\fancyhead[L]{\leftmark}

% Right-aligned footer with page number
\fancyfoot[R]{\thepage}
This example places the chapter title in the left side of the header and the page number in the right side of the footer. You can also add custom text or change the layout to suit your needs.
5.3.2 Page Numbering Options
Page numbers are usually required in theses, and LaTeX gives you several options for customizing them. You can control the position, style (e.g., Roman or Arabic numerals), and starting number.
To start with Roman numerals (typically for the front matter like the table of contents and abstract) and then switch to Arabic numerals for the main body:
latexCopy code% Roman numerals for front matter
\pagenumbering{roman}

% Switch to Arabic numerals for the main body
\newpage
\pagenumbering{arabic}
You can also choose whether to place page numbers in the header or footer and whether they should be centered or aligned to the left or right.
5.4 Customizing Sections and Chapters
LaTeX automatically numbers sections, subsections, and chapters. However, you can customize how these numbers appear and modify the spacing or formatting around section titles.
5.4.1 Changing Section Numbering
If you want to change how sections and subsections are numbered (e.g., turning off section numbering), you can use the \section*{} and \chapter*{} commands to create unnumbered sections and chapters:
latexCopy code\chapter*{Acknowledgments}  % Unnumbered chapter
\section*{Introduction}     % Unnumbered section
5.4.2 Customizing Chapter Titles
To customize the appearance of chapter titles, you can use the titlesec package:
latexCopy code\usepackage{titlesec}

\titleformat{\chapter}[display]
  {\normalfont\Huge\bfseries}{\chaptername\ \thechapter}{20pt}{\Huge}
This example formats the chapter title to be bold, large, and preceded by the word “Chapter.” The \chaptername and \thechapter commands ensure that both the word “Chapter” and its number appear.
5.4.3 Adjusting Spacing Around Titles
To modify the spacing before and after section or chapter titles, you can use the \titlespacing command:
latexCopy code\titlespacing*{\chapter}{0pt}{20pt}{40pt}
This changes the space before and after chapter titles. The first value controls the indentation, the second controls the space before the title, and the third controls the space after.
5.5 Customizing Tables of Contents, Figures, and Tables
LaTeX automatically generates lists for the table of contents, figures, and tables. However, you may need to customize these lists for your thesis.
5.5.1 Customizing the Table of Contents
The tocloft package allows you to customize the table of contents (TOC) by adjusting the formatting and depth of sections included.
To modify the TOC depth (i.e., which levels are shown), use:
latexCopy code\setcounter{tocdepth}{2} % Includes up to subsections in TOC
To format the appearance of the TOC:
latexCopy code\usepackage{tocloft}
\renewcommand{\cftchapfont}{\normalfont\bfseries}  % Bold chapter titles
\renewcommand{\cftsecfont}{\normalfont\itshape}    % Italic section titles
5.5.2 Customizing the List of Figures and Tables
Similarly, you can adjust the formatting of the List of Figures or List of Tables by modifying their commands. Here’s an example of how to modify the appearance of figure captions:
latexCopy code\usepackage{caption}
\captionsetup[figure]{labelfont=bf, textfont=it}  % Bold labels and italicized text
This sets the figure labels to bold and the figure text to italics.
Chapter 6: Managing Citations and References
Managing references is one of the most important aspects of thesis writing. LaTeX simplifies this process with BibTeX.
Using BibTeX for Bibliography
Create a .bib file for your references. Example:
@article{einstein1905,
author = {Albert Einstein},
title = {On the Electrodynamics of Moving Bodies},
journal = {Annalen der Physik},
year = {1905}
}
In your LaTeX document, add the following commands:
\bibliographystyle{plain}
\bibliography{mybibfile}
Customizing Citation Styles
You can change the citation style using different bibliography styles such as plain, ieeetr, or apa
\bibliographystyle{ieeetr}Chapter 7: Creating Figures and Tables
Inserting figures and tables is crucial for academic writing. LaTeX provides a simple way to manage them.
Inserting Figures
You can insert figures using the graphicx package:
\usepackage{graphicx}
\begin{figure}[h]
\centering
\includegraphics[width=0.5\textwidth]{figure.png}
\caption{This is a sample figure.}
\end{figure}
Inserting Tables
Tables are created using the tabular environment.
\begin{table}[h]
\centering
\begin{tabular}{|c|c|c|}
\hline
Column 1 & Column 2 & Column 3 \
\hline
Data 1 & Data 2 & Data 3 \
\hline
\end{tabular}
\caption{Sample Table}
\end{table}
Chapter 8: Advanced Features for Thesis Writing
Cross-referencing Sections, Equations, and Figures
You can cross-reference sections, figures, and equations using \label{} and \ref{}.
\label{sec:intro}
\ref{sec:intro}
No Responses